We recently discussed webhooks internally at work and the question popped on how to maintain and log the activity. Webhooks normally have a limited timespan (could be years though), and they should generally be kept a secret even if they are accompanied by a token that authorizes the caller.
What better way to log the webhook calls than using OMS Log Analytics? Once the data is logged there you have a plethora of options on what to do with it. Go ask my colleague Stanislav.
I also wanted to try out the fairly new Azure Functions, which acts as a relay to Log Analytics Data Collector API. The webhook itself comes from an Azure Automation runbook.
I documented the entire solution on Github, and you can find the repository here - it takes you from A to Z on how to setup the various moving parts in Azure. I hope you can find some inspiration on how to manage your webhooks.
torsdag den 29. september 2016
mandag den 26. september 2016
Hello Azure Functions - Integrating with Github
I had a hard time finding out how to integrate a Github Repository into Azure functions, or rather what files and the structure to put in the repository so that Azure Functions would pick them up. A very basic setup follows.
This assumes an understanding of Github and Azure Functions. There are plenty of resources out there explaining that better than I can.
Now create a folder called HelloAzureFunctions. Inside that create a file, function.json:
And in this case we will use PowerShell; we need a file called run.ps1:
That is it! Commit to Github and go to your Azure Function app and integrate with the repository. The HelloAzureFunctions should appear as a function after a short while.
You can fork my repository if you like, https://github.com/spaelling/hello-azure-functions. There is also a a PowerShell script there that can be used for testing (you can just paste in the webhook URI in a browser if you rather like that).
Also keep your webhooks a secret. In the aforementioned script I show how to get the webhook URI from an Azure Key Vault.

This assumes an understanding of Github and Azure Functions. There are plenty of resources out there explaining that better than I can.
Github
Create a fresh repository and create a file, host.json, in the root:
{
 "functions" : [
  "HelloAzureFunctions"
 ],
 "id": "ed5d78e575e14f0481c899532d41f5c0"
}
Now create a folder called HelloAzureFunctions. Inside that create a file, function.json:
{
    "bindings": [
        {
            "type": "httpTrigger",
            "name": "req",
            "direction": "in",
            "methods": [ "get" ]
        },
        {
            "type": "http",
            "name": "res",
            "direction": "out"
        }
    ]
}
And in this case we will use PowerShell; we need a file called run.ps1:
$requestBody = Get-Content $req -Raw | ConvertFrom-Json
$name = $requestBody.name

if ($req_query_name)
{
    $name = $req_query_name
}

Out-File -Encoding Ascii -FilePath $res -inputObject "Hello, $name"
You can fork my repository if you like, https://github.com/spaelling/hello-azure-functions. There is also a a PowerShell script there that can be used for testing (you can just paste in the webhook URI in a browser if you rather like that).
Also keep your webhooks a secret. In the aforementioned script I show how to get the webhook URI from an Azure Key Vault.

fredag den 16. september 2016
Analyzing your bank statement using PowerBI
I wanted to figure out what we were spending our money on, but our bank is lacking behind when it comes to finance insight, so what better way than to use PowerBI?
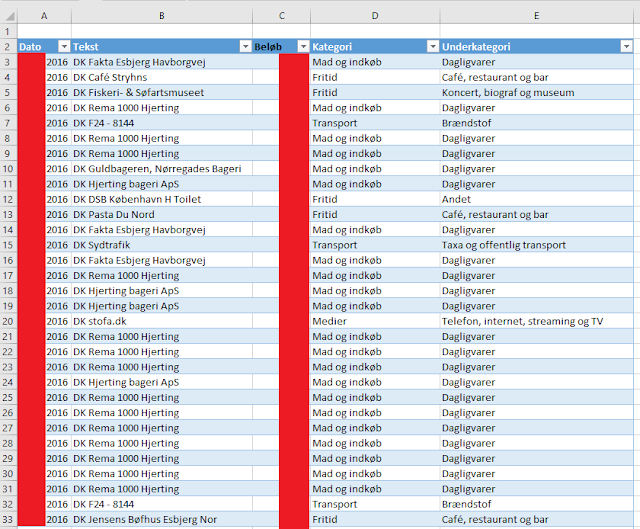
First you need to export your bank statements into CSV. We have multiple accounts, so I just looked into the account that we use for everyday shopping (food, etc.). I had some trouble importing into PowerBI, so I imported the CSV data into Excel where you then have to select (all) the data and make it into a table (ctrl+t) before you can import it into PowerBI.
I had to sanitize the data; removing transfers from one account to another and purchases that should have been made on another account. If you spot something later simply remove the row in excel and import the file again.
You are now ready to create some reports based on the bank statement data. It should look something like this (if there is only a single row in the fields box it means that PowerBI was unable to make sense of the data):
Now check the box next to the Σ and then one of the other options and then click the pie-chart icon. My bank statement comes with category and sub-category for each entry. If you have some sort of categorisation, and checked that, then you will see something like this (without redactions):
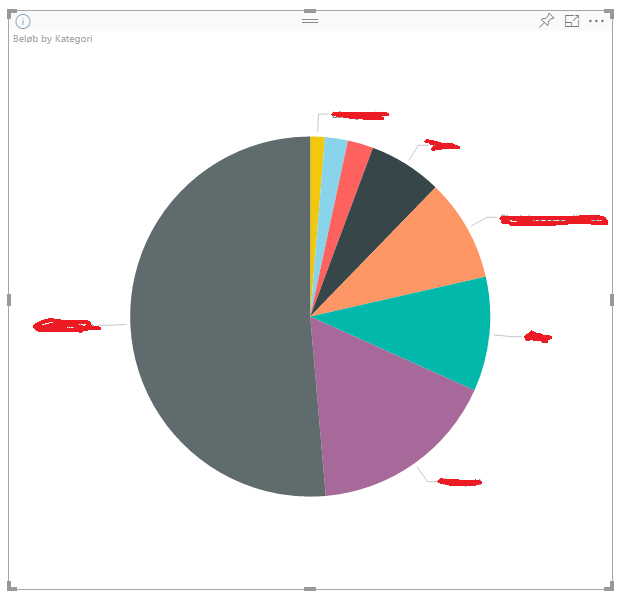
Wow! Ok, you could do that in Excel also (I would spend hours how to figure this out in Excel though). It simply shows the distribution of purchases into each category. The big one is grocery-shopping, which is the primary purpose for this account.
Now comes the magic. Deselect the graph and then again click on the Σ, and whatever translates into an entry description and select the table icon. That is more or less just what we have in Excel, right?
Select one of the categories in the piechart and see what happens.
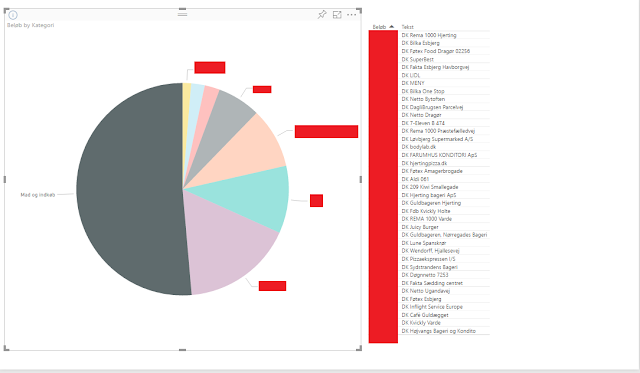
It now shows only the entries (summary of the amount) in the table that are related to the category that you selected. This is just the tip of the iceberg. PowerBI can do much more than that!
Finally you can figure out what your wife is spending all your money on ;)
First you need to export your bank statements into CSV. We have multiple accounts, so I just looked into the account that we use for everyday shopping (food, etc.). I had some trouble importing into PowerBI, so I imported the CSV data into Excel where you then have to select (all) the data and make it into a table (ctrl+t) before you can import it into PowerBI.
I had to sanitize the data; removing transfers from one account to another and purchases that should have been made on another account. If you spot something later simply remove the row in excel and import the file again.

You are now ready to create some reports based on the bank statement data. It should look something like this (if there is only a single row in the fields box it means that PowerBI was unable to make sense of the data):

Now check the box next to the Σ and then one of the other options and then click the pie-chart icon. My bank statement comes with category and sub-category for each entry. If you have some sort of categorisation, and checked that, then you will see something like this (without redactions):

Wow! Ok, you could do that in Excel also (I would spend hours how to figure this out in Excel though). It simply shows the distribution of purchases into each category. The big one is grocery-shopping, which is the primary purpose for this account.
Now comes the magic. Deselect the graph and then again click on the Σ, and whatever translates into an entry description and select the table icon. That is more or less just what we have in Excel, right?
Select one of the categories in the piechart and see what happens.

It now shows only the entries (summary of the amount) in the table that are related to the category that you selected. This is just the tip of the iceberg. PowerBI can do much more than that!
Finally you can figure out what your wife is spending all your money on ;)
How Awesome is Docker?
Fully configured Ubuntu server up and running in minutes? On Windows? Impossible you say? It is not!
Start by installing Docker. We will try to run the following Python code in the Docker container.
Copy this snippet to a file and name it somecode.py. Create a file called Dockerfile and paste the following into it.
Then run these few lines of PowerShell.
It may take some time to download the Ubuntu base image (ca. 500mb).
I intentionally put in an error. We did not import the os library in the Python code. Uncomment import os and run the PowerShell code again. That was it. You can easily install additional Python libraries by editing the Dockerfile.
You can run the container in Azure and there are various services for running Docker containers for you.
Start by installing Docker. We will try to run the following Python code in the Docker container.
try:
    from slackclient import SlackClient
    #import os # we need this for the next line
    # print the environment variable we exported in Dockerfile
    print(os.environ.get('SOME_TOKEN'))
except Exception as e:
    print("Error when importing 'SlackClient'")
    print(repr(e))
else:
    print("Succes!!!'")
finally:
    pass
Copy this snippet to a file and name it somecode.py. Create a file called Dockerfile and paste the following into it.
FROM ubuntu:latest
# update apt-get then install python3.5 and pip3
RUN apt-get -y update && apt-get install -y python3.5 && apt-get install -y python3-pip
# update pip3
RUN pip3 install --upgrade pip
# install python modulesslackclient
RUN pip3 install slackclient==1.0.0
# copy source files
COPY somecode.py /src/somecode.py
# export some tokens
ENV SOME_TOKEN='this is a token'
# run the bot
CMD ["python3.5", "/src/somecode.py"]
Then run these few lines of PowerShell.
cd $PSScriptRoot
# build the image (based on 'Dockerfile' in this folder) - ignore the security warning
docker build -t codebeaver/dockerisawesome --force-rm .
# run a container using the image we just created, --rm means we remove the container after it exists
docker run --rm codebeaver/dockerisawesome
It may take some time to download the Ubuntu base image (ca. 500mb).
I intentionally put in an error. We did not import the os library in the Python code. Uncomment import os and run the PowerShell code again. That was it. You can easily install additional Python libraries by editing the Dockerfile.
You can run the container in Azure and there are various services for running Docker containers for you.
Abonner på:
Opslag (Atom)